03 Mar 2021
Well, this review has been a long time coming. The bulk of the post was written in November 2020, but I’m finally publishing it in March 2021 after waiting 4+ months for a reply from Dr Han-Kwang Nienhuys regarding use of the test charts later on in the post. He still hasn’t replied, but I figured the review would soon become obsolete considering the product churn on AliExpress and processing the images through the card means they’re not useful as a reference chart for other products.
Dr Nienhuys, if you’re reading this, please let me know if you’d like me to remove the images.
Summary
This review is very long so here’s a quick summary.
Hardware, Software and Features
Hardware is lightweight but solidly built and the device functions as advertised with YUY2 output support at 1080/60 capture. The card uses standard plug-and-play USB functionality and appears as a webcam in Windows 7 and onwards, though the audio input is a separate microphone device and doesn’t appear in the video stream.
There isn’t any resolution scaling built into the card so what you put in over HDMI is what you get out over USB. It uses an Etron eEver EJ511 for HDMI to USB conversions, but I’m not sure what the HDMI conversion chip is.
The card mostly “just works” with inputs but some odd resolutions trip it up - my Canon camera won’t output its higher resolution (1920x1079) but drops back to 720x480. Interlaced video does not work well with this card as it uses a naive deinterlacing algorithm. Avoid using the card over USB 2.0 if possible; the MJEPG compression looks terrible.
Latency is fine but nothing special, not as low as the cheaper USB 2.0 CamLink clones but low enough that it’s like a TV.
Colours are acceptable (visible though not large differences) but definitely choose higher bit depths if possible; colour noise is apparent at 8bpc but disappears at 10/12bpc.
Summary Conclusion
Pretty decent for a $35 USD capture card, recommended if you want cleaner video than the CamLink clones floating around on various eCommerce websites.
Introduction
I’m definitely on the tail end of the trend here with reviewing cheap Chinese capture cards. Most reviews seem to have been posted around June and focused on work-from-home webcam usage, but I decided to hold off buying one for a while as Canon’s EOS Webcam Utility was good enough for Zoom calls.
I eventually bit the bullet during AliExpress’s 11/11 sale, picking up a Rullz “Navy U3” card for around $35 USD including eParcel shipping - around 15% off the listed price after taxes and the like. This one doesn’t seem to be as common as the USB 2.0 and coffee-coloured models (at the time of purchase I could only find one other seller called “h1111z” that seems to have copied the Rullz listing), but there’s been a steadily increasing number of sellers offering the same product which is manufactured by Shenzhen Suo-Feixiang Technology Co., Ltd (SOFLY) under the product name “Grey hdmi video capture USB 3.0 HDMI Video capture with loop”.
Still, I think a bit of a deeper look into the performance of this card (à la this fantastic post by Yoonsik Park and this OBS forum post by EposVox) is justified, especially considering most reviews focus on the low-end black model and not even the supposedly 1080/60 capable coffee-coloured card.
Features
All of the models have different feature-sets. I’ve replicated the seller’s comparison table here:
| Model Name |
USB 2.0 Black |
USB 3.0 Coffee |
USB 3.0 Navy |
USB 3.0 Navy U3 |
| Features |
|
|
|
|
| Input Port |
HDMI |
HDMI |
HDMI |
HDMI |
| Input Max Res. |
4K/30 |
4K/60 |
4K/60 |
4K/60 |
| Output Port |
USB 2.0/HDMI |
USB 3.0/HDMI |
USB 3.0/HDMI |
USB 3.0/HDMI |
| Recording Max Res. |
1080/30 |
1080/60 |
1080/60 |
1080/60 |
| Passthrough Max Res. |
4K/30 |
4K/60 |
4K/60 |
4K/60 |
| Optical Audio Output |
❌ |
❌ |
✔ |
✔ |
| External Power Required |
✔ |
✔ |
✔ |
✔ |
| 1080/60 Capture Support |
❌ |
MJPEG |
MJPEG |
MJPEG & YUY2 |
| USB 3.0 Capture Performance |
- |
Low
Regular Speed |
Medium
Faster Speed |
High
Fastest Speed |
This table is quite misleading - the seller’s told me the “U3” part of the name actually stands for “USB 3.0” which is backed up by what the manufacturer’s Alibaba page says. On the other hand, the other “USB 3.0” models seem to be only USB 2.0 capable; SOFLY’s product page says “USB 2.0” for the “Navy” card even though the connector’s blue, and the omission of YUY2 (uncompressed 4:2:2 video) output at 1080/60 in favour of highly compressed MJPEG is a key indicator of insufficient bandwidth (most likely from a USB 2.0 connector).
Apparently the “Coffee” model has some issues capturing 1080/60 footage so they suggest getting the “Navy” models for that instead. It wouldn’t be unreasonable at first glance to assume that’s from the USB 2.0 cable shipped with the “Coffee” models, but the aforementioned apparent omission of USB 3.0 from the low-end “Navy” model means there’s probably some internal differences and it’s not just a branding thing. Please get in touch if you’ve bought one of these cards - I’d love to hear anyone else’s experiences and ask you a couple of questions if you have time.
Hardware
There wasn’t really an unboxing experience to speak of; the capture card came packaged inside a bog-standard padded yellow envelope wrapped in a thin layer of foam and with some cables inside zip lock bags. The seller shipped a USB 2.0 cable with my card (you can decide whether that was accidental or deliberate) and later sent a USB 3.0 cable at my cost, but I couldn’t be bothered waiting so I picked up a USB 3.0 type A male-to-male cable from a local retailer after doing a couple of brief tests with the supplied cable.
As the model name suggests, this card comes in a blue-grey aluminium shell that has some logos printed on the top.
There are two sides populated with ports: the left (going by the logos) has USB power in, HDMI in, and optical audio out, while the right has a USB 3.0 type-A connector for data and a passthrough HDMI out. USB power into the micro USB port is only required if you want HDMI passthrough without a data connection; the device requests 600mA of power over USB 3.0 and functions perfectly fine without it.
However, only the V+ and GND lines are connected for the micro USB port, meaning if it follows the USB specification then it should only draw 100mA (micro USB 2.0). I haven’t tested this but I doubt this is the case especially considering the amount of heat the device puts out (warm but not hot).
I don’t have any tools capable of analysing HDMI support or the like (my monitors are 1080p), but the specifications (4K/60 passthrough) suggest at least HDMI 2.0 support which is downscaled to a maximum of 1080/60 for capture over the USB bus.
The ends are fastened to the main shell using 4 Phillips-head screws, and unscrewing them allows the entire board to slide out of the casing. This is a fairly standard low-cost construction method. The green PCB has the text sofly 3720 silk-screened on it, and the board revision for my sample is SFX_VC_0101(EJ)_v1.0 manufactured on 2020.08.27. The soldering quality seems decent with a lot of surface-mounted components that I’ll discuss a bit later.
Interestingly, the capture card enumerates as an Etron Technology, Inc. “eEver USB Device” with the serial number 20000130041415. This gives our first hint as to who the actual capture chip is manufactured by, and the eEver website has a product page that very closely resembles what we have; this card is an EJ511-based solution which lines up with the markings on the board’s components.
The EJ511 is pretty common in video capture solutions; LINDY uses it in their HDMI to USB 3.0 Video Capture Device, and there are many other cheap capture devices that use this chipset. Unfortunately the HDMI chip is stuck below a heatsink and there’s foam on the bottom, but from what I could glean it’s paired with a Chipsea CS32F030C8T6 ARM Cortex-M0 core and 25Q32BSIG SPI flash memory from ELM Technology. Datasheets for the EJ511 are available on Thxtek.
The display device is reported as a GSV2K11 CAP but I can’t find any information on this model number.
Software
The card uses USB Video Class (UVC) which means driverless plug-and-play support on all modern operating systems. This is all par for the course when it comes to modern capture cards.
This means it works nicely with pretty much everything since it’s a UVC device and not emulating a webcam using a DirectShow filter on Windows. OBS, Zoom, Webex, and even UWP Skype and the Windows 10 Camera app all worked with the card.
If you’ve stumbled across this post while looking at the Macrosilicon MS2109-based USB 2 cards, those ones have an issue where the “96KHz” audio is actually an interleaved 48KHz capture with the first (left channel) sample missing.
The capture card I’m testing changes its reported capture resolution based on the input, so this has a couple of implications with regard to OBS and other capture solutions.
- This card doesn’t have any inbuilt resolution scaling; as long as your input has a sane resolution then your input will be directly output over USB.
- This means some interesting resolutions don’t play well with the card, for example my Canon EOS 100D (SL1 for readers from the US) outputs 1920x1079/60p which the card doesn’t support, so it falls back to 720x480/60 which looks comparatively terrible.
- If the input resolution or framerate changes, you’ll need to deactivate and reactivate the capture card to start a new stream. If the card is set to capture at default settings then OBS automatically handles the change upon switching but you’ll need to do it manually through the Properties window if you’re using a custom resolution/framerate/etc.
- The capture card doesn’t have any test frames or the like, so you’ll either have a black screen (if the settings are incorrect) or a persistent display of the last captured frame depending on why the settings are incorrect.
USB Quirks
There are a couple of “gotchas” to watch out for with this card.
- The card only exposes USB 2.0 when connected over a USB 2.0 bus, so there won’t be a notification asking you to connect it to a faster port if your cable is faulty or your computer only works with USB 2.0 devices.
- MJPEG and YUY2 are locked to the card’s USB speed, so you can’t even use low-resolution/framerate YUY2 over USB 2.0 even if the data rate is low enough for the bandwidth on the slower interface. It goes the other way too - you must use YUY2 over USB 3.0 even if you want to use MJPEG, though that’s less of a problem considering most PCs still have USB 2.0 ports.
- There are some major issues with MJPEG output from this card though, so it might be best to stick with YUY2 regardless.
HDCP support was present on my sample, but this can vary between manufacturers so your experience might be completely different.
I don’t have any optical audio receivers so I can’t test that part of the card, but the listing says it supports LPCM output (unspecified number of channels and sample rates/bit depth).
USB 2.0
The MJPEG output on this capture card is pretty terrible; there’s serious artifacting and the horizontal resolution at 1080p seems to be half of what it should be (vertical lines are extremely blurred), though I’m honestly not sure how much of that is scaling and how much is compression. The hardware MJPEG encoder also seems a bit buggy with the lower half of the display showing some major synchronisation issues so I recommend avoiding it (get a different one if you’re intending to use this on USB 2.0 machines).
It also only supports limited RGB (tested on MJPEG over USB 2.0), so make sure you set your devices and capture software to limited mode to have accurate colours. A quick side-by-side test in OBS shows variable latency between 3-7 frames at 1080/60 (50-116ms delay) between OBS’s display capture and the video capture device input. These figures are good to acceptable compared to EposVox’s tests, but the methodology is quite different so I’m not sure how comparable they are (I used a slow motion phone camera pointed at a display).
USB 3.0
When it’s connected over USB 3.0, the only exposed video format is YUY2 as compared to the MJPEG over USB 2.0. Vertical and horizontal lines are clean and crisp, though the 4:2:2 chroma subsampling means text with subpixel rendering and edges on colours are a bit blurrier than direct display capture through OBS.
Colours are clean and reasonably accurate, but the card’s OBS properties need to be set to Rec. 601 and limited range capture in order to match display capture. The card seems to convert full range inputs to limited range outputs which can cause banding on gradients from full-range sources from the tone-mapping between full and limited modes but it shouldn’t be noticeable outside of test scenarios. Limited range inputs seem to be further limited to 0-253 while full-range inputs are mapped between 0-254. I don’t think this is major but it’s something which may be important for artistic or colour-accurate work.
Latency over USB 3.0 is slightly improved as well with the same camera-based test showing a consistent 4-5 frame difference at 1080/60 (67-83ms) with buffering disabled. This is also a reasonable result which makes playing through OBS’s fullscreen projector akin to a normal TV and I’d be alright with playing games through OBS’s preview and not even through the zero-latency passthrough port which is necessary in some even slower capture cards. I wouldn’t want to play timing-sensitive games through the preview though.
Resolution
I’m testing this card with two different graphics cards - a Skylake-based Intel GPU with HDMI 1.4b and an AMD Polaris-based GPU with HDMI 2.0.
Here are the supported input resolutions when tested using the Intel GPU over MJPEG:
| Resolution |
Refresh Rate (Interlaced) |
Refresh Rate (Progressive) |
| 640x480 |
- |
60, 67, 72, 75 |
| 720x240 |
- |
60 |
| 720x400 |
- |
70 |
| 720x480 |
60 |
60 |
| 720x576 |
50 |
50 |
| 800x600 |
- |
56, 60, 72, 75 |
| 832x624 |
- |
75 |
| 1024x768 |
- |
60, 70, 75 |
| 1152x864 |
- |
75 |
| 1152x870 |
- |
75 |
| 1280x720 |
- |
24, 50, 60 |
| 1280x800 |
- |
60 |
| 1280x960 |
- |
60 |
| 1280x1024 |
- |
60, 75 |
| 1440x480 |
- |
60 |
| 1440x900 |
- |
60, 75 |
| 1600x1200 |
- |
60 |
| 1680x1050 |
- |
60 |
| 1920x1080 |
50, 60 |
24, 25, 30, 50, 60 |
| 2800x240 |
- |
60 |
| 2880x480 |
- |
60 |
| 3840x2160 |
- |
24, 25, 30, 50, 60 |
| 4096x2160 |
- |
24, 25, 30, 50, 60 |
Here are the supported input resolutions when tested using the AMD GPU over MJPEG:
| Resolution |
Refresh Rate (Interlaced) |
Refresh Rate (Progressive) |
| 640x480 |
- |
59, 60, 67, 72, 75 |
| 720x480 |
- |
59, 60 |
| 800x600 |
- |
56, 59, 60, 72, 75 |
| 832x624 |
- |
59, 60, 75 |
| 1024x768 |
- |
59, 60, 70, 75 |
| 1152x864 |
- |
59, 60, 75 |
| 1152x872 |
- |
59, 60, 75 |
| 1280x720 |
- |
50, 59, 60 |
| 1280x800 |
- |
59, 60 |
| 1280x960 |
- |
59, 60 |
| 1280x1024 |
- |
59, 60, 75 |
| 1440x900 |
- |
59, 60, 75 |
| 1600x900 |
- |
59, 60 |
| 1600x1200 |
- |
59, 60 |
| 1920x1080 |
25, 29, 30 |
23, 24, 25, 29, 30, 50, 59, 60 |
| 1920x1200 |
- |
30, 50, 59, 60 |
| 2048x1536 |
- |
30, 50, 59, 60 |
| 2560x1440 |
- |
30, 50, 59, 60 |
| 3200x1800 |
- |
30, 50, 59, 60 |
| 3840x1620 |
- |
30, 50, 59, 60 |
| 3840x2160 |
- |
30, 50, 59, 60 |
Using YUY2 (USB 3.0) enables all of the progressive refresh rates of 1920x1080 at higher resolutions.
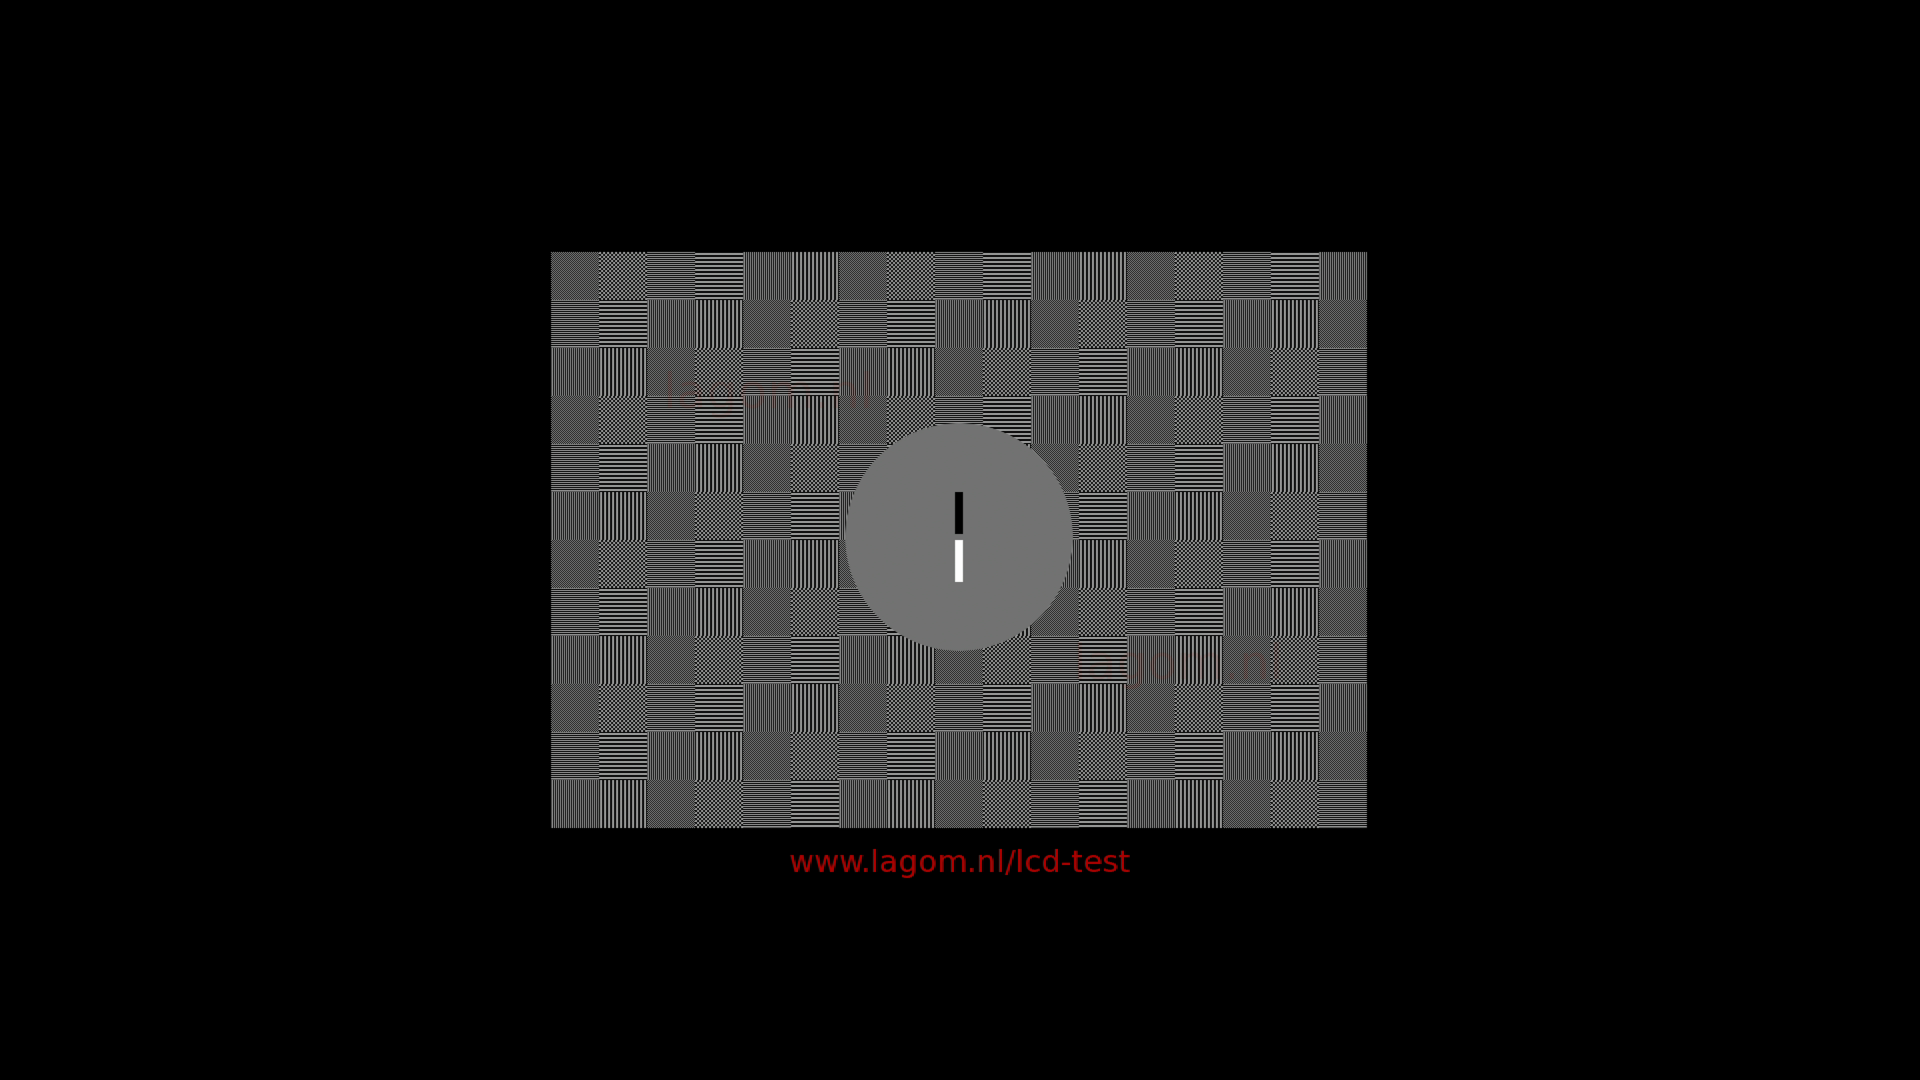
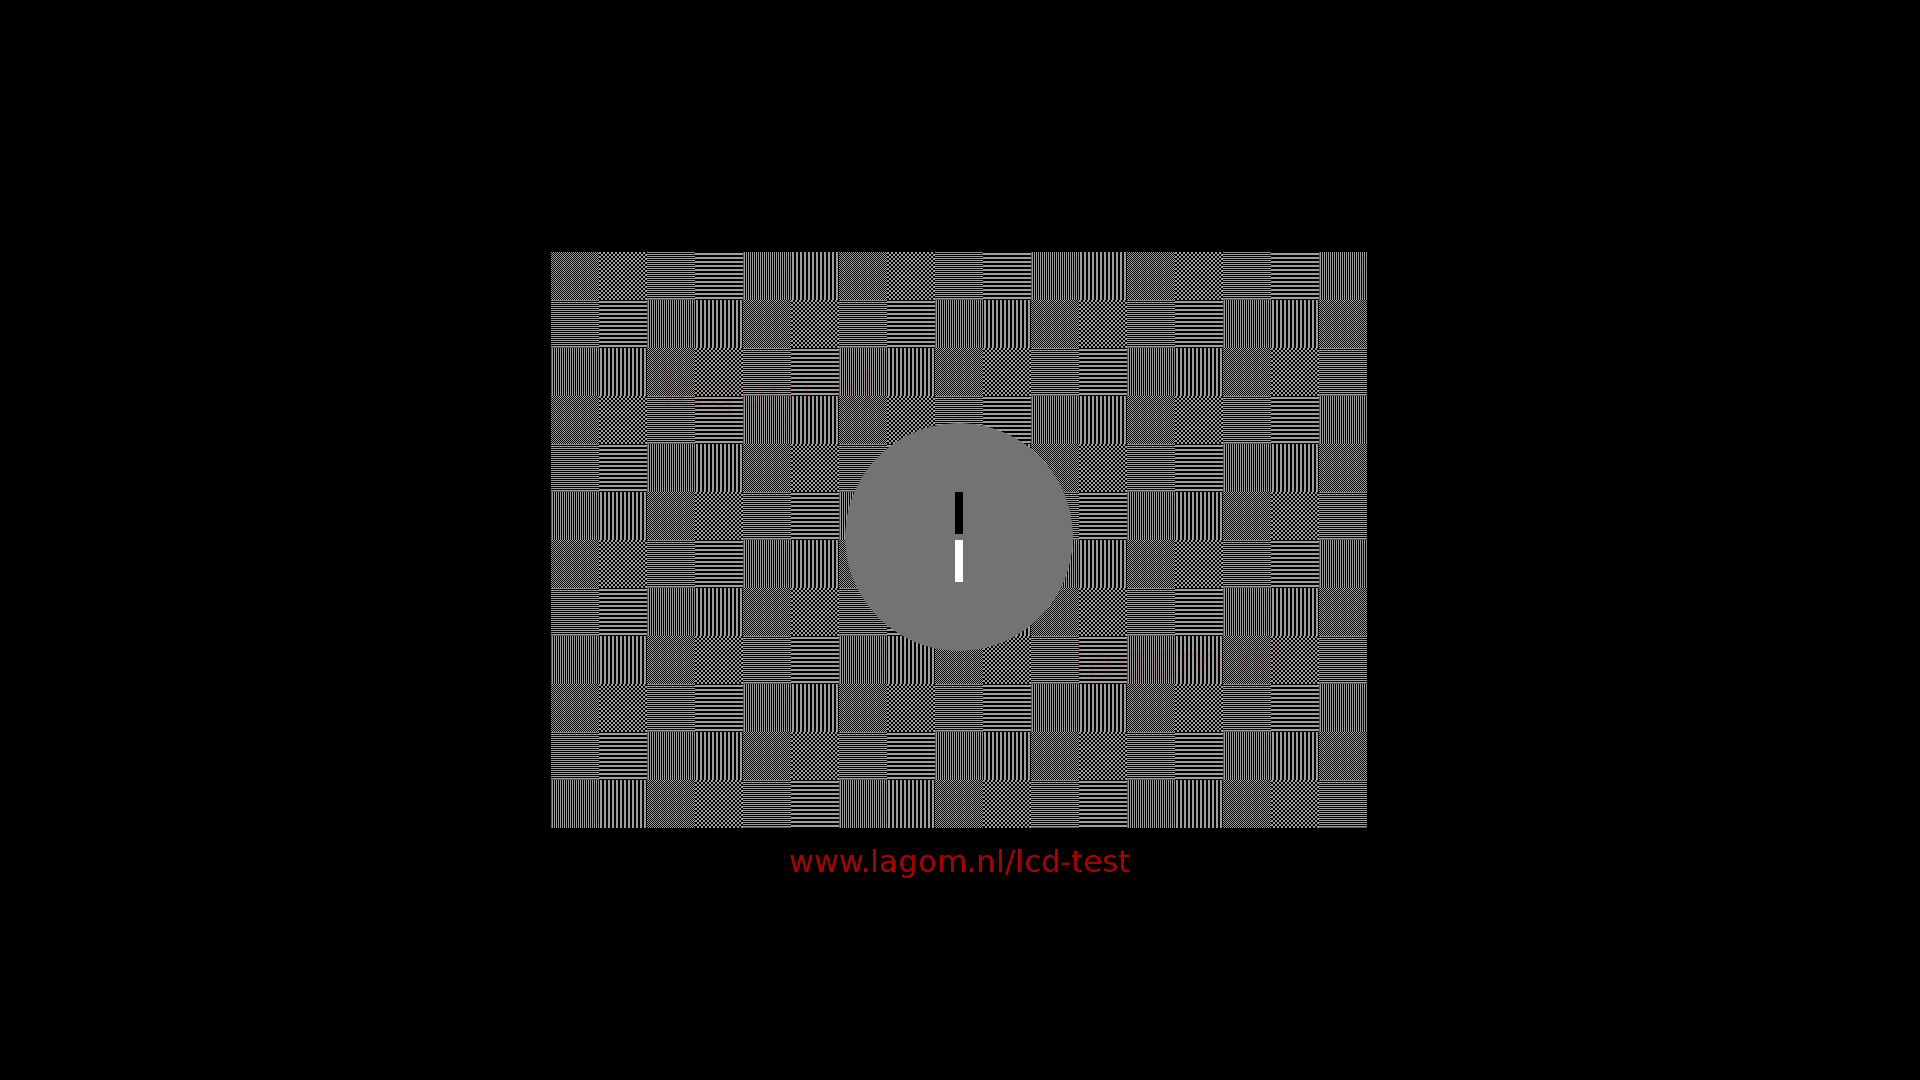
The following charts are PNG captures of the Lagom LCD monitor test pages after being passed through the capture card and screenshotted from the OBS fullscreen preview at 1920x1080 (the card’s maximum output resolution). YUY2 was used for the following captures as I wanted to see what the capture card was capable of doing at its best quality settings.
Interestingly, Windows reports 12-bit output at 1080/60 and below, though this falls to 8-bit output at UHD and DCI 4K output. HDR is not supported.
Images are significantly degraded due to resizing for improved loading speeds, please click on a picture to see the original capture.
4K (3860x2160)
There is a noticeable difference between GPU-upscaled 1920x1080 and true 1920x1080 (see the next section) which seems to be largely a loss of contrast and some ghosting from chroma subsampling. I recommend using native 1920x1080 signals if you’re capturing 1920x1080 content (on Windows, make sure the active signal resolution is 1920x1080 and not 3840x2160).
Native 4K (downsampled to 1920x1080)

This is about as expected with averaging occuring across the entire frame. I think the chroma subsampling is causing the grey tone in the boxes which were originally 2x2 pixels wide, but I’m not experienced with video analysis so send me an email if you have any better ideas.
Upscaled 4K (original source is 1920x1080)

As previously mentioned, this is slightly softer and has more artifacting than native 1920x1080 content. This might be from the GPU when it upscaled it, but I’m more inclined to say it’s due to the downscaling inside the capture card.
1920x1080

This is the card’s highest supported capture resolution with a reported data rate of 248.832 MB/s of uncompressed YUY2 video.
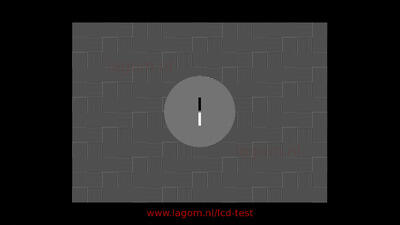
Interlaced


This card’s interlaced performance is mediocre with apparently interpolated lines from the vertical fields. The output changed between the above two frames 30 times a second, meaning significant flickering when faced with horizontal lines spaced 1 pixel apart and a halving of apparent vertical resolution.
Progressive
Progressive scan performance is excellent with clean, crisp lines across the entire test image which basically perfectly matches the reference image.
1280x720
This is very similar to the 1920x1080 progressive scan result; excellent sharpness with no brightness differences.
720x480

The test chart doesn’t fit on the screen at 100% scaling but the viewable portion is identical to the 1280x720 and 1920x1080 outputs.
Frame Rates
I didn’t notice any issues with dropped frames, but I don’t have the equipment to properly analyse the output and frame-times. Please get in touch if you’ve got results for your own sample and would like me to publish them here!
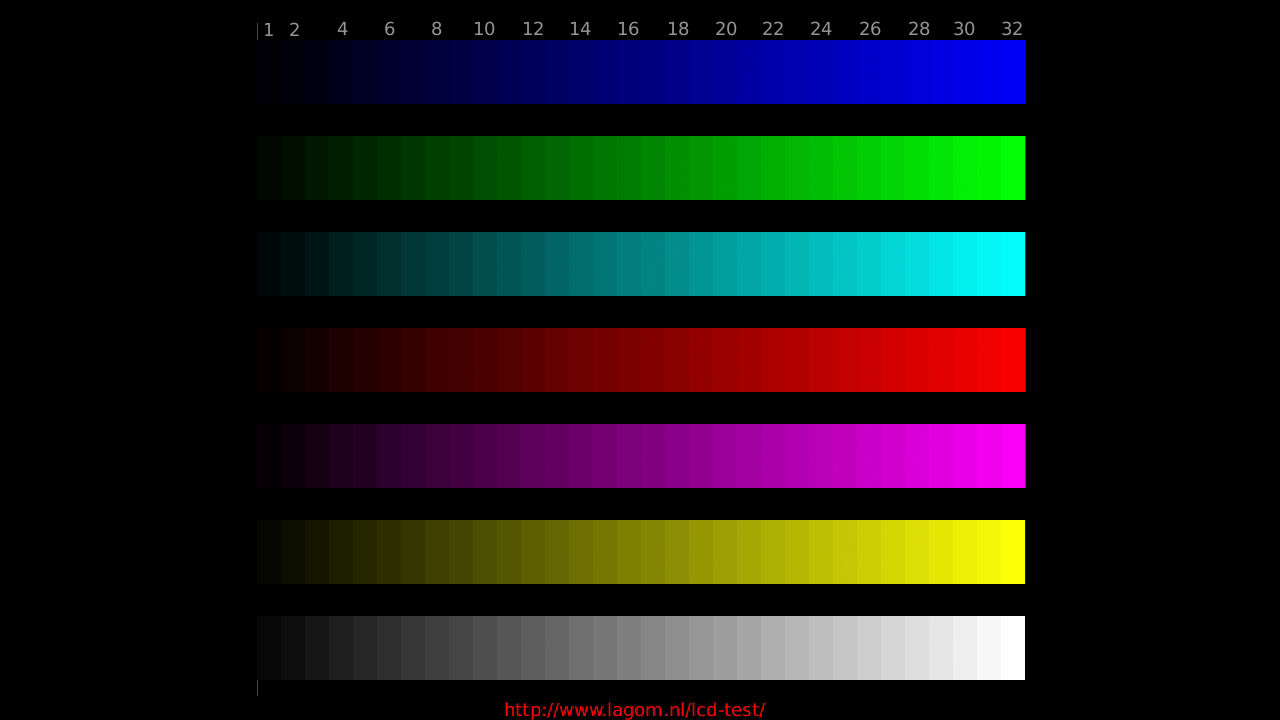
Colour Accuracy
These tests were done on the AMD GPU with the output mode set to RGB 4:4:4 limited mode to avoid tone-mapping issues, and OBS’s video capture device properties were also set to limited mode and Rec. 601 colour space capture. Unless otherwise noted, bit depth was set to 8bpc for consistency between capture resolutions. “Levels” are from 0-255 in the RGB colour space. OBS itself was running with the NV12 colour format, Rec. 709 colour space, and full colour range (Settings -> Advanced).
Overall colours are consistent between capture resolutions and framerates, though 1080/60 and below source resolutions show noise at 8bpc which is removed by increasing the colour bit depth. Colours differ slightly from the reference image (random sampling shows a Delta-E of below 3 across swatches) but should be acceptable for the card’s intended purposes and price-point.
4K/60 (1080/60 Capture)
Native 4K (downsampled to 1920x1080)

Colour consistency is good, though compared to the reference blues are 5-8 levels too dark, greens are slightly tinged with around 1-3 levels of both R/B, and reds are also slightly too dark with 1-3 levels of green.
Upscaled 4K (original source is 1920x1080)

There are minor colour inconsistencies inside swatches, but overall colour rendering is OK with otherwise identical colours to the native 4K sample.
1080/60 (1080/60 Capture)

8bpc capture at 1920x1080 shows the same colour noise as the upscaled 4K and the same colour rendering.
12bpc removes this colour noise while keeping the same colours, so I recommend using 12bpc where possible.
720/50 (720/50 Capture)

I had some issues with getting 1280x720/60 working with my GPU so I swapped to 50Hz instead.
8bpc is identical to 1080/60 captures at 8bpc and similarly 12bpc removes the colour noise. I haven’t included a 12bpc image.
Conclusion
It’s good. Well, that’s oversimpifying a bit.
If I didn’t know how much it cost, I don’t think this card would be my top pick. The feature set is limited (no scalers or waiting messages), it doesn’t support HDR, high framerate support is limited, and both interlaced YUY2 and MJPEG output over USB 2.0 are objectively terrible.
However, considering the price ($35 USB is a fraction of the cost of other 1080/60 capable capture cards), picking on those points is a bit superficial. You’re still getting sharp* captures with reasonably accurate colours* and my one even supports HDCP which is a rarity for commercially available capture devices.
Having a decent core experience is the most important thing to focus on when making something inexpensive like this, and I think the team at SOFLY has correctly identified the critical things for a good capture card. Sure, it’d be nice to have HFR support, or HDR-aware captures with perfect colours, or even something that just tells you it’s not getting a signal. But these limitations aren’t going to stop someone from getting a usable (or dare I say decent) signal into OBS, and I can wholeheartedly recommend this card for the average person who wants a step up from the MJPEG-only $9 sticks and doesn’t want to splurge on an expensive, professional-level capture card.
*when configured properly
Send me an email if you have any questions or feedback - my details are on the contact page linked in the menu.
28 Nov 2018
Introduction
I recently had a UWP app completely stop working for me, as in it wouldn’t be updated through the store, “normal” uninstallation through the Start Menu and Settings app didn’t work, PowerShell couldn’t remove it properly, and even an in-place upgrade did nothing to fix it.
This blog post is the result of 6+ hours of Google searches, fruitless chats with Microsoft Tier 1 support, and stumbling around blindly inside the undocumented parts of Windows Microsoft doesn’t want you touching.
Uninstall Steps
WARNING: The following instructions can completely break your Store installation. I am only posting what worked for me, and these instructions are provided for you to follow at your own risk. I am not responsible if anything goes wrong.
Please make backups before doing anything.
With that out of the way, here’s what I did to force the Windows Store to “forget” it had ever existed.
Normal Uninstall
Might as well try this while you’re at it, it’ll save you quite a bit of time if you manage to do it this way.
- Find the app’s full package name by running
Get-AppxPackage | Select Name, PackageFullName and doing a “Find” inside any text editor.
- Run
Remove-AppxPackage -AllUsers [the full package name here] without the square brackets.
- Hope it works.
If it errors out with 0x80073CFA (especially with 0x80070002 in another error code) then you’ll probably have to do a full manual uninstall. Be prepared to spend a couple of hours on this.
Manual Uninstall (Windows 10 1803)
This information is outdated for newer versions of Windows 10. Scroll down for the updated instructions.
Huge thanks to the people who made the following forum/blog posts:
For reference, I was using Windows 10 1803 with the November 2018 cumulative update applied. This is untested on any other version.
- Manually delete everything that is linked to that app. This includes the following (but is not an exhaustive list)
- All folders that exactly match the app’s full package name (the package name is obtained by running
Get-AppxPackage | Select Name, PackageFullName in PowerShell and looking for the full name). You can find them by running dir /AD /s [your full package name here]
- All registry entries that exactly match the app’s full package name. You may be able to delete the parent folders as well, use your own judgment to figure out what’s safe or not. Again, make a full system backup before doing this, and verify the backup works first
- The XML file that matches the app’s package name in
C:\ProgramData\Microsoft\Windows\AppRepository\
- The folder that matches the app’s package name in
C:\ProgramData\Microsoft\Windows\AppRepository\Packages\
- Any entries referencing the app in
C:\ProgramData\Microsoft\Windows\AppxProvisioning.xml
-
Download and install any SQLite database editor. I used DB Browser for SQLite
-
Launch your editor as NT AUTHORITY\SYSTEM. You can use multiple tools for this, including Process Hacker and the PSTools Suite
-
Open the database C:\ProgramData\Microsoft\Windows\AppRepository\StateRepository-Deployment.srd and look for a row in the table AppxManifest that has your app mentioned in the Xml column, and delete that row. Write the changes to disk (I recommend backing up the existing database first to avoid issues).
- Open the database
C:\ProgramData\Microsoft\Windows\AppRepository\StateRepository-Machine.srd and delete the row in the table Package that has your app’s full package name in the column PackageFullName. This is a multi-step process, and all the instructions below are for DB Browser for SQLite.
- On the “Database Structure” tab, scroll down until you see the “Triggers” section.
- Right-click on the
TRG_AFTERDELETE_Package_Key trigger and click “Copy Create statement”. You’ll need this for later, so paste it in a text document and keep it handy.
- Delete the
TRG_AFTERDELETE_Package_Key trigger. This is to avoid SQLite complaining about “no such function: sroptions (your SQL statement here)”.
- Move to the “Browse Data” tab, find the correct entry in the
Package table, and press “Delete Record”.
- Re-add the database trigger by pasting and running the trigger create statement you copied earlier. If you don’t have this, revert your changes and get it from your database backup (you did make one, right?)
- Write the database changes to disk.
- Re-open the Store. The app should now be marked as “Owned” but not “Installed”.
Manual Uninstall (Windows 10 20H2)
Updated on 2020-11-28
Thanks to Robin G and Jean B for feedback on the procedure for newer versions of Windows 10.
- Manually delete everything that is linked to that app. This includes the following (but is not an exhaustive list)
- All folders that exactly match the app’s full package name (the package name is obtained by running
Get-AppxPackage | Select Name, PackageFullName in PowerShell and looking for the full name). You can find them by running dir /AD /s [your full package name here]
- Some apps have additional packages installed alongside them, for example the Zoom Rooms app has
[snip]_neutral_~_r9fg4ykbbcwvc in addition to the main package [snip]_x86__r9fg4ykbbcwvc. Remember to delete these as well!
- All registry entries that exactly match the app’s full package name. You may be able to delete the parent folders as well, use your own judgment to figure out what’s safe or not. Again, make a full system backup before doing this, and verify the backup works first
- Keys in the StateRepository cache (
Computer\HKEY_LOCAL_MACHINE\SOFTWARE\Microsoft\Windows\CurrentVersion\AppModel\StateRepository\Cache\Package\Data\) are set to read-only for administrators so you might need to launch regedit as SYSTEM.
- The XML file that matches the app’s package name in
C:\ProgramData\Microsoft\Windows\AppRepository\
- The folder that matches the app’s package name in
C:\ProgramData\Microsoft\Windows\AppRepository\Packages\
- If the app is a preinstalled or system-wide app then also remove any entries referencing the app in
C:\ProgramData\Microsoft\Windows\AppxProvisioning.xml.
- This can break things if you create a new user profile, so re-add the app once you’ve successfully reinstalled it.
-
Download and install any SQLite database editor. I used DB Browser for SQLite
-
Launch your editor as NT AUTHORITY\SYSTEM. You can use multiple tools for this, including Process Hacker and the PSTools Suite
- Open the database
C:\ProgramData\Microsoft\Windows\AppRepository\StateRepository-Machine.srd and look for any rows that mention your package name. The tables I needed to delete rows from are listed below alongside any additional steps required to delete them (your app may have different entries, this is just what Zoom Rooms needed):
- Activation
- In the Database Structure tab, scroll down to the Triggers section
- Find the trigger called
TRG_BEFOREDELETE_Activation_SRJournal
- Right-click its row and press “Copy Create statement”. Paste it somewhere safe - you’ll need it later.
- Delete the trigger by right-clicking it and pressing “Delete Trigger”
- Delete the row in the Activation table
- Re-add the trigger by pasting the create statement in the “Execute SQL” tab and pressing the “Execute all” button
- Application
- Follow the same steps as the
Activation table, but this time for the TRG_BEFOREDELETE_Application_SRJournal trigger
- ApplicationIdentity
- BundlePackage (find the “Bundle” integer here - delete the associated one in “Bundle”)
- MrtApplication
- MrtPackage
- Package
Save the package ID first - we’ll need it for the next step.
- Follow the same steps as the
Activation table, but this time for the TRG_BEFOREDELETE_Package_SRJournal trigger
- PackageFamily
- Follow the same steps as the
Activation table, but this time for the TRG_BEFOREDELETE_PackageFamily_SRJournal trigger
- PackageIdentity
- PackageLocation
Write the changes to disk (I recommend backing up the existing database first to avoid issues).
- Open the database
C:\ProgramData\Microsoft\Windows\AppRepository\StateRepository-Deployment.srd and look for a row in the table AppxManifest that has the package ID you previously got from StateRepository-Machine.srd in the Package column. Right-click the rows and delete them.
- Also do this for the
File and PackageSourceUri tables. You can shift-click on multiple records to bulk select.
-
Run wsreset.exe
- Re-open the Store. The app should now be marked as “Owned” but not “Installed” and should be reinstallable. If you run into an error, try pressing the “Retry” button and it should eventually redownload.
- If you don’t plan on reinstalling the app then I still recommend redownloading and uninstalling it to clean up anything not mentioned in this guide.
Wrap Up and Finishing Words
UWP is a fantastic idea. Sandbox absolutely everything and keep each app in its own folder, all with user-friendly controls through the Store and Settings apps. It succeeds in that, and I applaud the Windows team for finally catching up to macOS and some Unixes.
However, it can get extremely ugly as soon as something breaks. The only other “approved” or “sanctioned” ways to interact with the system are through a group of PowerShell cmdlets, and it’s really hard to peek behind the scenes and get an idea of what it’s actually doing. I only figured out there was a SQLite database controlling all this through a lucky Google search, which really isn’t what I’d want if I was making documentation for Windows.
If anyone on the Windows team is reading this, please, please have an option in Settings to force uninstall an app. Spending hours poking through the dark side of Windows to uninstall a single app is incredibly bad UX, and I don’t even know what caused this in the first place. Was it a botched update? Was it a stray gamma ray or something flipping a critical bit? There’s near zero visibility in what UWP does internally.
I hope these steps helped you. Feel free to drop me an email if you’ve got any comments, I really appreciate any feedback.
13 May 2018
Nowadays, using a VPN is almost required if you want to keep some sort of anonymity on the Internet. The introduction of metadata retention legislation allegedly for detecting and stopping online crime means law enforcement (at least in some jurisdictions) now has warrantless access to where you accessed data from, when you did it, and the servers you downloaded it from.
Unfortunately for the privacy-concerned consumer, many restrictive firewalls often found in companies and educational institutions (as well as some public Wi-Fi) try to block all traffic that’s not web browsing. This makes sense for the network operator since most users don’t need anything past Facebook, Netflix, and Spotify, all of which would connect fine since they have web access. The issue is when someone tries to connect to a VPN: the firewall picks up that it’s not someone using their web browser and shuts the connection.
Fortunately, there are two protocols that are designed to trick firewalls into thinking it’s a HTTPS connection: the open-source SoftEther, and Microsoft’s proprietary SSTP. (sidenote: the official SoftEther server supports SSTP as well, but that’s something to discuss in another post)
Regrettably, most well-known providers don’t offer either, leaving their customers stranded when they’re behind one of these firewalls.
Some services that (at the time of writing) don’t support either SSTP or SoftEther are:
- Private Internet Access
- NordVPN (Previously offered (tweet), no longer available)
- Tunnelbear
- IPVanish
- CyberGhost
- HideMyAss
It’s clear that most major providers don’t support it (and thus can’t go through very restrictive firewalls), but there are still a few that do support SSTP. SoftEther is considerably rarer, probably because it’s not very well-known and requires yet another client to be installed on customers’ computers.
With all that out of the way, let’s go to the main part of this article.
Providers that support SSTP and/or SoftEther
This table was last updated on the May 13, 2018. Data may be outdated, please double-check before making a purchasing decision based off these results.
These companies have not been checked for data security or retention policies. Again, please do research before subscribing to any VPN.
| Provider |
SSTP |
SoftEther |
Notes |
| VPN Gate |
Some |
Yes |
Volunteer project run on SoftEther |
| LimeVPN |
Yes |
Yes |
|
| ExpressVPN |
Yes |
No |
|
| PureVPN |
Yes |
No |
|
| hide.me |
Yes |
No |
|
| CactusVPN |
Yes |
Yes |
|
| BananaVPN |
Yes |
Yes |
|
| RapidVPN |
Yes |
Yes |
|
| LibertyVPN |
Yes |
No |
|
| VPNShazam |
Yes |
No |
|
| TotalVPN |
Yes |
No |
|
| EarthVPN |
Yes |
No |
|
| TorGuard |
Yes |
No |
|
| BitVPN |
Yes |
No |
|
| BestVPN |
Yes |
No |
|
I personally run my own VPN service using SoftEther on a cheap VPS since it gives me almost complete control over how my data is used. You still have to trust the VPS provider, but I have total control over what software I use, which ports they’re running on, and there’s no congestion.
However, it can take some effort to maintain and stay on top of software patches, so it’s definitely not for everyone. It can also cost a bit more and you don’t have the wide range of regions a commercial provider offers.